


Thursday, November 21, 2013
Your Take On Bleached Eyebrows?
Permanent solution: Feeling as edgy as Miley? Want to just go all in and try it out? Visit a salon to get them bleached. We highly recommend this, especially since this requires using a harsh chemical near your eye. You want a practiced and experienced hand helping you out. The cost shouldn't be too outrageous. Make sure that they test a part of your skin away from your face to ensure you are not allergic to the chemicals they are using. Wouldn’t want a skin irritation or burn to occur because they forgot to test.
Try it out for fun: Maybe you want to live the life of a rebel just for a day. There is a temporary option for you. See steps below:

Saturday, November 16, 2013
Hair Product Ingredients to Avoid Pt. 1

You often hear of ingredients that should be in your hair care products, but it's not every day that we hear about the ingredients that we should avoid within our haircare products. It is so important to know exactly what you are putting in your hair to ensure that you're not causing more damage to it. After all, you wash, condition and use other products to encourage health and regrowth, so why would you want to use products with ingredients that do the absolute opposite, right? Here are the top 5 ingredients that you want to avoid. It is time to start checking the label, ladies.
ISOPROPYL ALCOHOL is a poisonous substance which pretty much takes away natural substances qualities. It sucks the life out of the good stuff, pretty much, and unfortunately, it is found in a variety of hair color rinses, body rubs, hand lotions, after-shave lotions, fragrances and many other cosmetics, so keep your eyes peeled. Using products with this ingredient will dry out your hair and completely break it off.
MINERAL OIL & PETROLATUM probably isn't something you'd immediately consider a bad ingredient because the word "oil" is in the name. However, mineral oil and petrolatum is used for industrial purposes and should not be used in your hair because it coats your strands and makes it appear and feel like plastic. So don't always trust an ingredient that has oil associated with it.
PEG, also known as polyethylene glycol can be found in products for your kitchen and intense bathroom cleaners... As well as hair products. That simply doesn't seem right, but it's true. This chemical is dangerous to your immune system so avoid using it at all costs.
PROPYLENE GLYCOL is an active component in antifreeze. Yes, believe it or not. Not only is it damaging to your skin and scalp, but it can also cause problems for your brain, liver and kidney while also promoting abnormalities.
SODIUM LAURYL SUFATE (SLS) & SODIUM LAURETH SULFATE (SLES) will irritate your scalp, and with the winter season here, you do not want to promote damage more than the weather already does. It is often used to create that "foam" or "lather" in soaps, but are actually extremely toxic and can cause internal and external damage.
Since finding natural products or at least hair care products that utilize healthy ingredients isn't hard to do, there is no reason why you should be subjecting yourself and your hair to such damage. There are many more ingredients that should be avoiding within your hair care products, so stay tuned for part two. Try to keep a check list in your purse as you go shopping to ensure that you never purchase products that do the opposite of what you desire for your hair.
Photo Credit: http://www.moroccanorganics.com/top-5-ingredients-to-avoid-in-hair-products/
Friday, November 15, 2013
The Wonders of Vaseline

Hello ladies, I hope you all enjoyed this past week. I hope you all overcame your weekly challenges, and are ready to enjoy the weekend to the fullest. In today's blog discussion I want to shed some light on the wonders of Vaseline. Let's take a further look.
The Skin: Okay, I'm all for great moisturizer, I love them. However, if my skin is really dry and I want immediate results, I apply Vaseline. I highly recommend applying Vaseline to the areas of the body that tend to dry faster than others, such as the elbows and behind the knees. You may also apply a small amount on your hands if they are very dry.
The lips: Okay, once again, if your lips are chapped or dry, applying a small amount of Vaseline can help repair them. You may even use it as lip stick remover. All you need to do is add a little bit of Vaseline to your lips, let it sit for a while, and then with a small cotton pad gently wipe it off.
For the Brows: Okay, this is something I just started doing not long ago, and I found that it works for me, so I thought I would share the tip. If you do your own eyebrows, apply a little bit of Vaseline after you have finished plucking. In adding Vaseline you're helping sooth the delicate eye tissue. And as a bonus, when you add the Vaseline you are able to tell if your eyebrows are even or not.
Nails: Okay, someone once told me that adding Vaseline to your nails helps them grow strong! Is this fact or fiction? My nails always break, and so I thought I would try it out, there is nothing to lose, right? Anyways, there is some truth to this, Vaseline has helped my nails get stronger but not necessarily grow. I would suggest adding some Vaseline to your bare nails after using nail polish remover, because let's be honest... No matter what nail polish remover you use it is still harmful to your nails.
Okay friends, that is all I have to say about Vaseline. If you know of any other beauty tips that have to do with Vaseline, please feel free to share. I hope you all have a good weekend.
Photo Citation: Abigail." Quick Pick: Vaseline."zuqka. 20 August 2013. 15 November 2013. web.
Thursday, November 14, 2013
Curing Your Hair Hangover
Did you have a memorable night of fist-pumping, hip swaying, head banging? Or maybe you just spent the day on a long, windy hike in the good ol' nature and wild? Whatever the event, you may find that your hair is feeling a little limp, greasy, tousled and everything but healthy and bouncy.
You can go ahead and put away the natural home remedies that you have to assemble and mix. Hair, please meet your hero the Morning After Kit - Detox by Drybar.
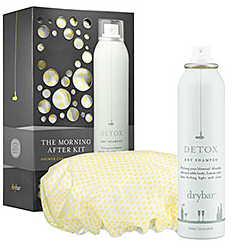
What Is It? Drybar's The Morning After Kit is a dry shampoo and comfortable shower cap. Drybar's Detox Dry Shampoo is a rejuvenating dry shampoo that absorbs excess oil and adds body to hair.
What Does It Do? Absorbs any excess oils and adds body to hair between washes, leaving hair fresh and clean. It is very lightweight and easy to use. The dry shampoo is designed to be a micro powder that blends in with any hair color, preventing any residue from forming or being left behind.
When Can I Use It? The Dance-Dance, Rockin' All Night Hair: If you've partied all night and woke up 15 minutes before you should be at work, don't sweat it. Put the shower cap on, rinse and wash your body. After drying your body and removing the shower cap, apply the dry shampoo that will instantly clean and refreshen your no longer limp locks. Restyle as you see fit and you're ready for the office. The Day-To-Night Hair Transition: After a day of working, your style may be a bit stiff and well, crunchy. That hairspray is not doing your night 'do any favors. Spray the dry shampoo onto your hair to boost life back into your strands, toss and tease, and you're ready for the night. Always On The Go Hair: If you are always on the move and just don't have time to wash your hair, this is the perfect addition to your purse or bag. This is a perfect oil-absorber, volumizer and on the go styling product.
Any Tips and Tricks? If you are experiencing dry or dull hair rather than oily and shiny, try 100 Proof Treatment Oil by Drybar. The Proof Treatment Oil is a hair treatment oil that provides amazing shine and helps rejuvenate dry, damaged hair. This also eliminates frizz and flyaways, perfect for mixing and layering with other hair products. It is virtually weightless and works on all hair types (even for those with thin hair) without weighing it down.
Friday, November 8, 2013
Incorporating Gold onto Your Outfit

Hello ladies, I hope you are all enjoying this Friday night. I know I'm extremely happy it's the weekend. I know most of us have been waiting for Friday, hahahaha. Anyways, today I want to talk about gold. I love gold and how it looks on many things. So, today I thought I would share with you guys how to incorporate gold into your outfit.
Print: Okay, first of all, who wears print items? Who likes to look fierce every now and then? Well adding gold accessories to your leopard print is the way to go. The gold makes for a killer look and it's defiantly fierce. Just add some red lipstick or some red shoes and you're more than ready for a night of adventure.
Colours : Alright, I don’t know if you ladies have noticed but there has been many colours of pants, dresses, shorts, ect ect, this past summer where Gold was incorporated into the buckle of the belt or in a sash. For these colder months, many of the pastel and bright colours are not worn. Therefore I suggest incorporating gold accessories into dark colours, such as blue, red, royal purple, or even navy. These colours look the best with gold accessories. Give it a shot, I promise you will love how it looks.
A colour to Avoid and a Shape that Always Works: Okay, since we're talking about Gold I highly recommend not to mix it up with yellow; most of the time gold and yellow clash. However, of you purchase a belt that's yellow and has a cold buckle it's very different, and often times its mustard yellow. Okay, now a shape that always works wonderfully with Gold is black. It looks awesome, especially if you're going out to a night event.
Phalange Rings: Have any of you tried of the phalange rings? I find them to be very cute and stylish. The gold ones look great with everything, especially with white and Red. The accessories, unlike the knuckle rings, don’t restrict you from moving your finger, which is I find is a good thing.
Okay lovelies, that is all I have for you guys today. I hope you all have a wonderful weekend; full of rest and fun. Until next time.
Photo Citation: The designer. "Midi rings" lolitaabrahamfashion. 14 May 2013. 8 November 2013. web
Thursday, November 7, 2013
Fun Fashion Nail Designs From Sephora
I have been perusing Sephora's website and spotted some awesome nail designs. And while they were intended for Halloween, the designs are so awesome that I think that these Halloween designs can be extended into the rest of the year!!!

The Prissy Missy- This is for those who are pretty, pink, and perky. 'The Prissy Missy' perfectly "captures the princess vibe".

Step One: Prep nail base by eliminating residue with Formula X Nail Cleanser. Lightly brush over nail bed.
Step Two: Prime with Formula X Base Coat to ensure nail color adhesion. Apply one coat, completely covering the nail.
Step Three: Brush on one coat of Formula X New Neutrals in Brazen. Let it dry for two to three minutes. For bolder color, add another coat and let dry three to five minutes.
Step Four: Apply Formula X Brilliants in Fine Like Einstein in diamond shapes, connecting each one at the tip. Let dry for three to five minutes.
Step Five: Finish the look with one coat of Formula X Top Coat.
The Abra Cadaver: This was originally intended to 'trick our your nails for Dia de Los Muertos'. While intended for a morbid purpose, this nail design is absolutely classy, sophisticated, and beautiful! Tre chic!

Step One: Prep nail base by eliminating residue with Formula X Nail Cleanser. Lightly brush over nail bed.
Step Two: Prime with Formula X Base Coat to ensure nail color adhesion. Apply one coat, completely covering the nail.
Step Three: Brush on one coat of Formula X New Neutrals in Larger Than Life. Let it dry for two to three minutes. For bolder color, add another coat and let dry three to five minutes.
Step Four: Starting at the bottom right corner of the nail, apply Formula X Xplosives in Blast Off moving toward the left corner of the tip in a diagonal. Let dry for three to five minutes.
Step Five: Finish the look with one coat of Formula X Top Coat.
The Malice In Wonderland: Oooh this design is for those cheeky vixens out there that know exactly what they want and how to get it. Emoting confidence? Or are you feeling a little on the bad side? Living on the edge? This is the nail design that says it all!

Step One: Prep nail base by eliminating residue with Formula X Nail Cleanser. Lightly brush over nail bed.
Step Two: Prime with Formula X Base Coat to ensure nail color adhesion. Apply one coat, completely covering the nail.
Step Three: Brush on one coat of Formula X New Classics in Pyrotechnic. Let it dry for two to three minutes. For bolder color, add another coat and let dry three to five minutes.
Step Four: Brush on Formula X Xplosives in Chaotic. Let dry for three to five minutes.
Step Five: Finish the look with one coat of Formula X Top Coat
Don't you just love nail play? While such a small detail, nail designs definitely add a subtle touch to any outfit. And plus its just so fun to play. Happy playing!
Saturday, November 2, 2013
Hair Brush Replacement 101

Oh, the hairbrush debate. Who knew that you had to properly clean a hair brush, and who knew that there were sometimes, despite it looking like the brush is brand new, it has to be thrown out? I certainly didn't, and my hair definitely paid the price. So, I am here to save your hair day. Yes, ladies... There is a time that you need to replace your hair brush. It may have all the bristle, and it may appear to be clean, but that means absolutely nothing when it comes to the hair brush world. Not replacing your hair brush can pay some serious damage to your locks, so don't be like me, and replace your brush before anything bad happens. Here is when to ditch the brush!
If It's Damaged
Damaged bristles will damage your hair. It's as simple as that. Worn out bristles will rough up the cuticles on your hair and as a result, you will get split ends, fly aways and all kinds of damage to your locks that simply isn't worth it. If you notice that some of the bristles have lost the "top" of them, or fallen out, it is time to replace the entire brush. Since this hair product is fairly cheap, you should try to do so regularly. After all, you're using your brush on a daily basis.
If It's Old
Simple, if you can't remember how long you have had your brush, how much it cost or where you got it... It's too old. You should never have a brush that you have had for a long time. There is all kinds of dust, dandruff, gunk and funk that have been built up in it over the years. Even a proper cleaning won't help an old brush. Ditch it, and invest $5 on a new one. Your hair will appreciate it and the style of your do will be much easier to achieve.
If It Stinks
Yuk! This should be a surefire sign as to when it is time to replace your hair brush. If it stinks, get rid of it! There is obviously bacteria growing in it that is causing the funk, and each time you use the hair brush, your hair is being put through some serious circumstances. Proper cleaning can sometimes solve this issue, but you could simply play it safe and get rid of it.
Think of it like this; you throw out your sneakers to prevent joint injuries, you replace your mattress to prevent back pain and you need to replace your hair brush to prevent hair damage. Do not risk it. Hair brushes are usually $5... So replace them as often as possible.
Photo Credit: http://www.denmanbrush.com/acatalog/Denman-D6-Bright-Detangling-Shower-Brush.html
Subscribe to:
Posts (Atom)